
zimfw은 Zim 프레임워크라고 합니다. Zim 프레임워크는 Oh my Zsh에 비해 더 빠른 실행 속도를 제공합니다. 플러그인 매니저, 프롬프트 테마, 모듈 등 Zsh 환경을 효율적으로 관리하고 커스터마이징 가능하도록 도와주는 도구입니다.
Oy my Zsh 관련 글은 아래를 참고하세요.
2023.08.31 - [Tools] - oh-my-zsh, powerlevel10k 테마 재설정 및 한글 폰트 설정
oh-my-zsh, powerlevel10k 테마 재설정 및 한글 폰트 설정
여기서는 설치 방법을 자세히 설명하지는 않겠습니다. 다만, 참고 링크를 보고 따라가면 잘 끝낼 수 있을 것입니다. 저는 잘 되었거든요^^ 설치는 아래 블로그를 참고했습니다. https://theoldface-dev.
movefun-tech.tistory.com
저는 iTerm2와 같이 사용하기 위해 Zimfw을 설치하려고 합니다. 아래는 MacOS에서 iTerm2을 설치하고, 간단한 창 분할 단축키를 소개하는 글입니다.
2025.11.24 - [Tools] - [MacOS, Homebrew, 터미널 화면 분할] iterm2 설치 및 사용법
[MacOS, Homebrew, 터미널 화면 분할] iterm2 설치 및 사용법
> Homebrew 설치는 아래 사이트를 참고해주세요. 명령어로 간단히 설치할 수 있습니다.https://brew.sh/ko/ HomebrewThe Missing Package Manager for macOS (or Linux).brew.sh MacOS에서 iterm을 설치하겠습니다. 먼저 Homebrew
movefun-tech.tistory.com
Zimfw 설치하기
공식 사이트 링크는 아래와 같습니다.
Home | Zim Framework: Modular, customizable, and blazing fast Zsh framework
predictive suggestions Zim Framework suggests commands as you type based on your history and completions, allowing easy access to commands once lost and forgotten.
zimfw.sh
이제 공식 사이트에서 요구하는 데로 zimfw를 설치하겠습니다. 설치는 아래를 확인하세요.
supercharge your terminal with Zim Framework
Zim Framework can be installed by running one of the commands below in your terminal.
저는 curl로 설치하겠습니다.
curl -fsSL https://raw.githubusercontent.com/zimfw/install/master/install.zsh | zsh
아래와 같이 설치가 완료되었습니다.
% curl -fsSL https://raw.githubusercontent.com/zimfw/install/master/install.zsh | zsh
) Using Zsh version 5.9
) ZIM_HOME not set, using the default one.
) Zsh is your default shell.

) Downloaded the Zim Framework script to /Users/donghui/.zim/zimfw.zsh
) Prepended Zim Framework template to /Users/donghui/.zimrc
) Prepended Zim Framework template to /Users/donghui/.zshrc
) Installed modules.
All done. Enjoy your Zsh IMproved! Restart your terminal for changes to take effect.
아래 명령어로 재시작을 해주겠습니다.
exec zsh
그러니 아래와 같이 나옵니다.

잘 적용된 것을 확인할 수 있습니다. 아래 명령어로 업데이트할 수 있습니다.
zimfw update
P10k 테마 설치하기
이제 P10k(PowerLevel10k)을 설치하겠습니다.
https://github.com/romkatv/powerlevel10k.git
GitHub - romkatv/powerlevel10k: A Zsh theme
A Zsh theme. Contribute to romkatv/powerlevel10k development by creating an account on GitHub.
github.com
공식 github 링크입니다. 여기를 보면 우선 폰트를 설치하라고 나옵니다. 관련 페이지는 아래와 같습니다.
https://github.com/romkatv/powerlevel10k/blob/master/font.md
powerlevel10k/font.md at master · romkatv/powerlevel10k
A Zsh theme. Contribute to romkatv/powerlevel10k development by creating an account on GitHub.
github.com
P10K 폰트 설치
폰트를 설치하는 이유는 개발자용 아이콘이 이 폰트가 없으면 나오지 않고, 네모난 박스(□)나 물음표(?)로 깨져서 보이기 때문에 이 폰트를 설치해야 합니다. 폰트는 Homebrew로 설치하겠습니다. Homebrew 사용 예는 아래를 참고하세요. (위에 같은 링크 있습니다)
2025.11.24 - [Tools] - [MacOS, Homebrew, 터미널 화면 분할] iterm2 설치 및 사용법
폰트는 아래 명령으로 설치할 수 있습니다. 관련 링크와 명령 적어두겠습니다.
https://formulae.brew.sh/cask/font-meslo-lg-nerd-font
font-meslo-lg-nerd-font
Homebrew’s package index
formulae.brew.sh
brew install --cask font-meslo-lg-nerd-font
설치가 완료되면 설정 파일에 테마를 추가해줍니다. 공식 깃허브에서 Zim을 확인하면 아래와 같이 쓰여있습니다.
Zimfw에 P10k 적용
Zim
Add zmodule romkatv/powerlevel10k --use degit to ~/.zimrc and run zimfw install.번역하자면 아래와 같습니다.
Zmodule romkatv/powerlevel10k --use degit을 ~/.zimrc에 추가하고 zimfw 설치를 실행하세요.
vi 편집기나 nano 에디터로 수정할 수 있겠지만, 더 단순한 아래 문법으로 해당 내용을 밀어넣어 보겠습니다.
echo '내용' >> 파일이름이제 내용에는 'zmodule romkatv/powerlevel10k --use degit'이 들어가야 하고, 파일 위치는 ~/.zimrc입니다. 따라서 아래와 같은 명령어를 입력해줍니다.
echo 'zmodule romkatv/powerlevel10k --use degit' >> ~/.zimrc
cat으로 확인해보면 가장 아래 다음과 같이 잘 추가된 것을 확인할 수 있습니다.
zmodule romkatv/powerlevel10k --use degit
이제 zimfw 메뉴얼을 살펴보겠습니다.
https://zimfw.sh/docs/commands/
Commands | Zim Framework: Modular, customizable, and blazing fast Zsh framework
The zimfw plugin manager installs your modules at ${ZIM_HOME}/modules and builds a static script at ${ZIM_HOME}/init.zsh that will initialize them. Your modules are defined in your ~/.zimrc file. The ~/.zimrc file must contain zmodule calls to define the m
zimfw.sh
여기서 아래와 같은 내용이 있습니다.
Added new modules to ~/.zimrc? Run zimfw install.
~/.zimrc에 새 모듈을 추가했나요? Zimfw 설치를 실행하세요.그럼 이제 zimfw install 명령으로 모듈을 설치하겠습니다.
zimfw install
터미널을 재시작하겠습니다.
exec zsh아래와 같은 내용이 나옵니다.
This is Powerlevel10k configuration wizard. You are seeing it because you
 haven't defined any Powerlevel10k configuration options. It will ask you a few
                      questions and configure your prompt.

                            Install Meslo Nerd Font?

(y)  Yes (recommended).

(n)  No. Use the current font.

(q)  Quit and do nothing.

Choice [ynq]:
y를 누르고 엔터를 눌러줍니다.
설치가 완료되었습니다.
Meslo Nerd Font successfully installed.

Please restart iTerm2 for the changes to take effect.

  1. Click iTerm2 → Quit iTerm2 or press ⌘ Q.
  2. Open iTerm2.

It's important to restart iTerm2 by following the instructions above. It's
not enough to close iTerm2 by clicking on the red circle. You must click
iTerm2 → Quit iTerm2 or press ⌘ Q.
시키는 대로 Command(⌘) + Q를 누르겠습니다. 프로그램을 완전히 종료하는 단축키입니다.
P10k 설정
종료된 iTerm2를 다시 실행합니다.
This is Powerlevel10k configuration wizard. You are seeing it because you
haven't defined any Powerlevel10k configuration options. It will ask you a few
questions and configure your prompt.
Does this look like a diamond (rotated square)?
reference: https://graphemica.com/%E2%97%86
---> <---
(y) Yes.
(n) No.
(q) Quit and do nothing.
Choice [ynq]:
위와 같이 물어봅니다. 네모 두개가 잘 보이냐는 의미입니다.

아이콘이 잘 보이므로 y 키를 눌러줍니다.
그리고 원하는 테마 디자인을 선택해줍니다.

iTerm2 설정
다크모드 테마 변경
테마를 다크 모드로 바꾸겠습니다.
1. Command + , 눌러서 설정을 엽니다.

2. Profiles로 들어갑니다.

3. General 오른쪽 Colors를 클릭합니다.
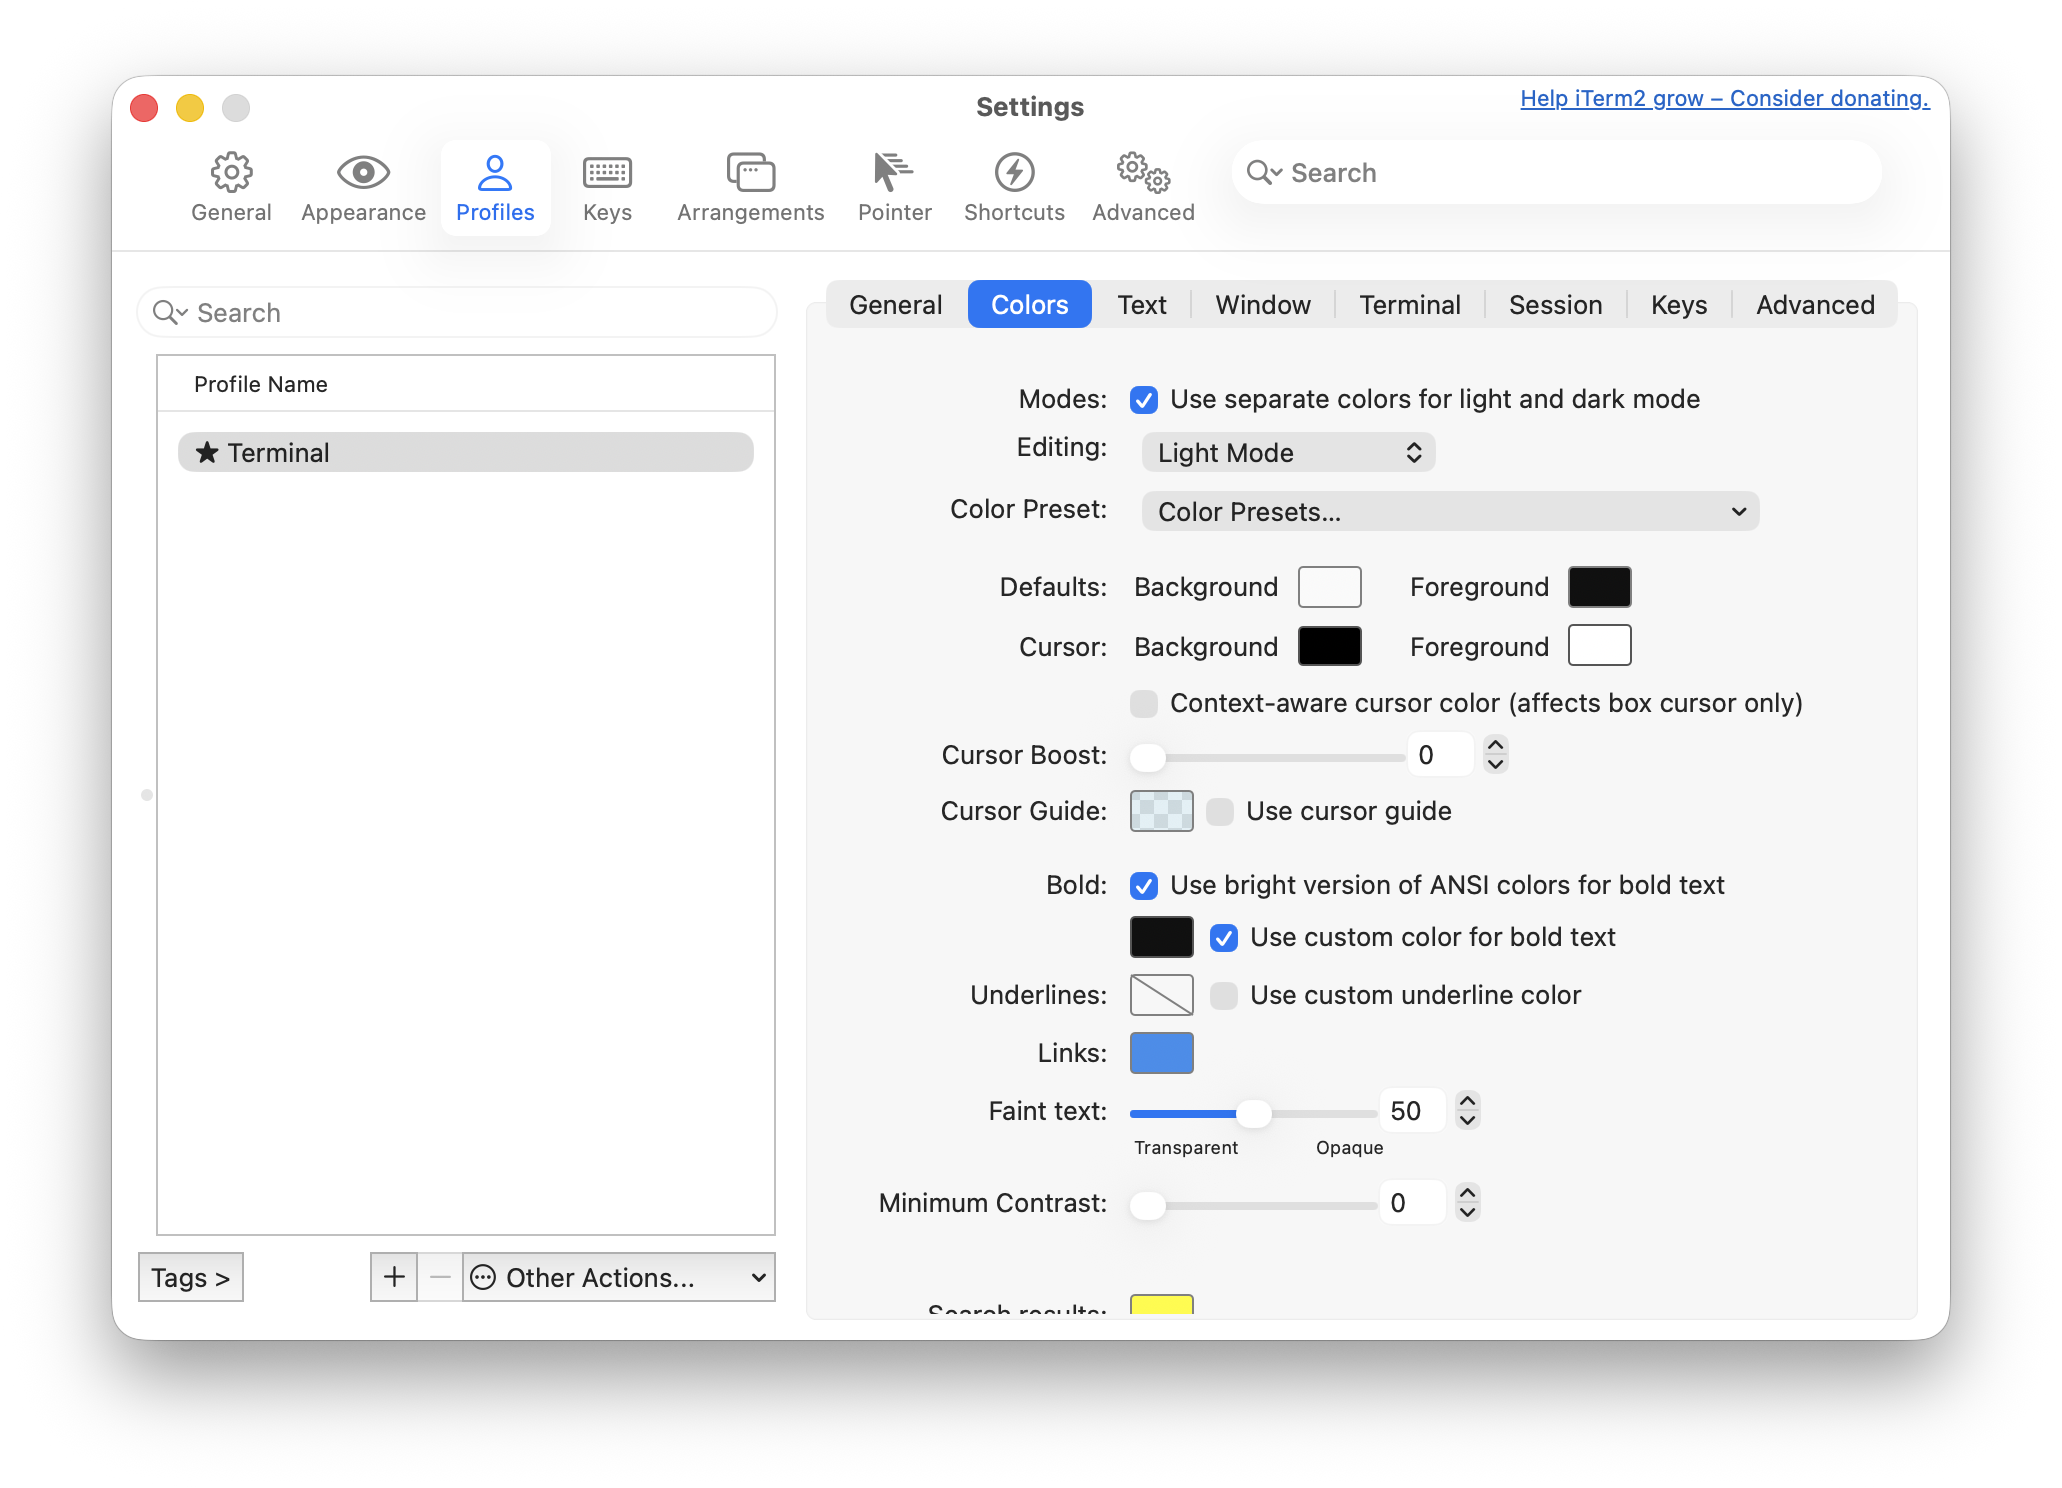
4. Color Preset 선택

5. Dark Background 혹은 Solarized Dark 선택
- 마우스를 올려 두면 실시간으로 변하는 테마를 확인할 수 있습니다.
- 마음에 드는 색의 테마가 나올 때, 클릭하면 됩니다.
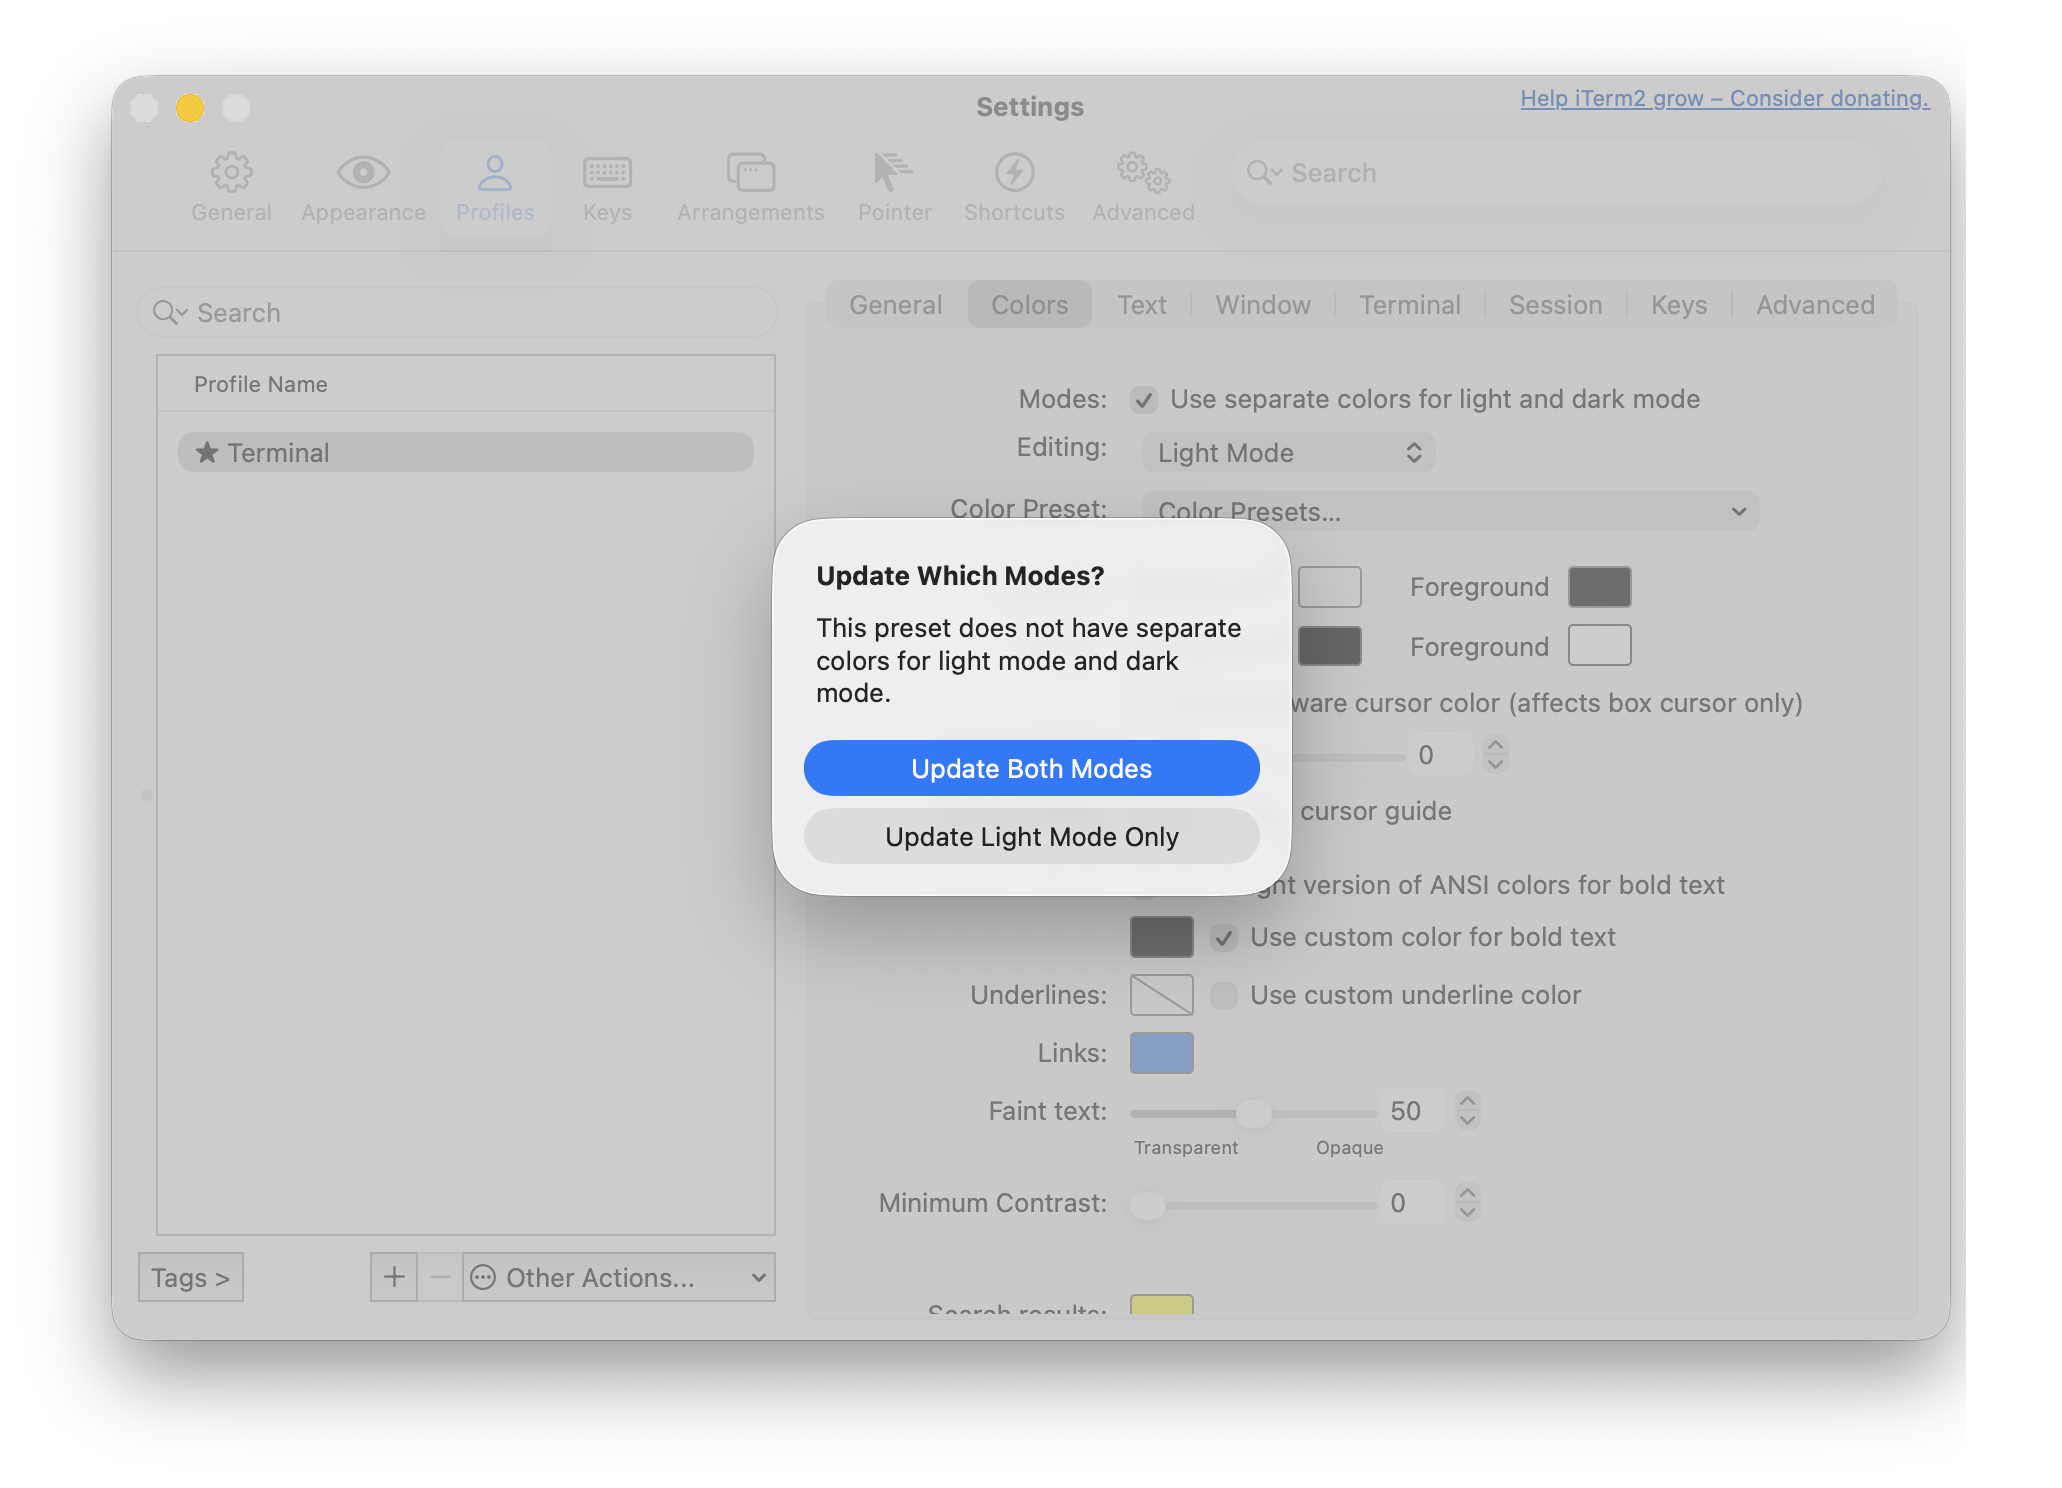
6. 확인 및 적용, Update Both Modes를 클릭 후 적용된 것을 확인합니다. 세팅이 완료되면 닫아줍니다.
기타 iterm 설정 (창 상단 이름 변경 및 고정)

1. [ Command + , ]로 설정 창을 엽니다.
2. Profiles로 이동합니다.
3. General을 확인합니다.
4. Title - Applications in terminal may change the title을 해제합니다.
5. Title을 Name에 Profile (Job)로 수정합니다.
6. Name을 원하는 이름으로 변경합니다.
7. zsh 쉘을 재시작합니다.